OSS Data Lakehouse - Kubernetes, Minio, Iceberg, Nessie and Spark combined!
Create a simple data management and processing system using only OSS software


I would like to present a step-by-step guide of setting up a simple Data Lakehouse using an open source stack that can easily servce as a baseline for creating a production grade system. Further down the road (next 1-2 posts) this will be expanded by components for orchestration, notebook access and BI/reporting.
As a reminder to many people (or organizations) who think they need something more than a single beefy computer to do the job - if you don't deal with peta- or even terabytes of data (with non-trivial processing) then most probably you do not need a full-blown Lake/Lakehouse. Instead, you should look into an OLAP database/warehouse like DuckDB or ClickHouse as combined with a strong server-grade machine it will suffice in a lot of scenarios without all the hassle.
Data Lakehouse - what is it?
In short it is a data management and storage system architecture that evolved from the previous Data Lake and Data Warehouse concepts by combining their strong points into a single package. So we have the following:
- Data Warehouse - operates on structured data in a common format (e.g. CSV or Parquet files), usually OLTP functionality.
- Data Lake - operates on structured and unstructured data (e.g. CSV, Parquet, text, image, audio files), no OLTP functionality.
- Data Lakehouse - operates on structured and unstructured data providing a common interface via a metadata layer which also provides additional functionality around the data (row-level operations, schema evolution, ACID transactions, time travel, etc.).
How to build it?
So we need to know what "primitives" we need to construct such a system. For the most basic scenario on which we'll focus in this post these would be:
- Storage - a way to store, read and write the data.
- Compute - we need a way to transform the data using a single or multiple computers (cluster).
- Data catalog - a layer above the file data that organizes them into tables via additional metadata.
There are many approaches and solutions to the above but my main goal is to present and use those that are:
- Free and open source
- Have been and are used in real-life production systems
- Based on widely accepted industry standards
Given the above, these are my choices for the stack and technologies that will be used:
- Kubernetes - distributed container orchestration and computation resource provisioning.
- MinIO - S3 compliant object store for data storage.
- Apache Parquet - columnar storage format.
- Apache Iceberg - open table format and metadata.
- Nessie - data catalog with some interesting Git-like features (a more battle-tested alternative would be Hive).
- Apache Spark - data processing framework, version 3+.
One of the advantages of the above stack is that it is relatively easy to move the setup into "the Cloud" if such a need arises as it is based on widely used and accepted technologies and formats.
The cluster
For computation and hosting we will be using the widely popular (albeit bit daunting and in some ways over-engineered) Kubernetes container orchestration.
We will use it to provision required compute to transform the data and in this example to also host the storage system and data catalog, although this can be done (and many times it is the best idea) by using a separate machine or cluster to avoid e.g. stability issues while accessing the data.
As this is an example, we'll use minikube to setup a cluster locally. But of course the instructions (90%+) and logic apply to k8s in general.
We'll use it configured to use more resources as the default is a bit too low before starting minikube:
minikube config set cpus 8
minikube config set memory 16384

minikube start
So assuming we have minikube and kubectl installed and working (the docs in the link above explain how to do it) we first would want to create a separate namespace lakehouse for our cluster. This can be done with the following command:
kubectl create namespace lakehouseEverything we use will be put into this namespace for simplicity. Although this is almost never a good idea in any real-life system for an example setup it should suffice.
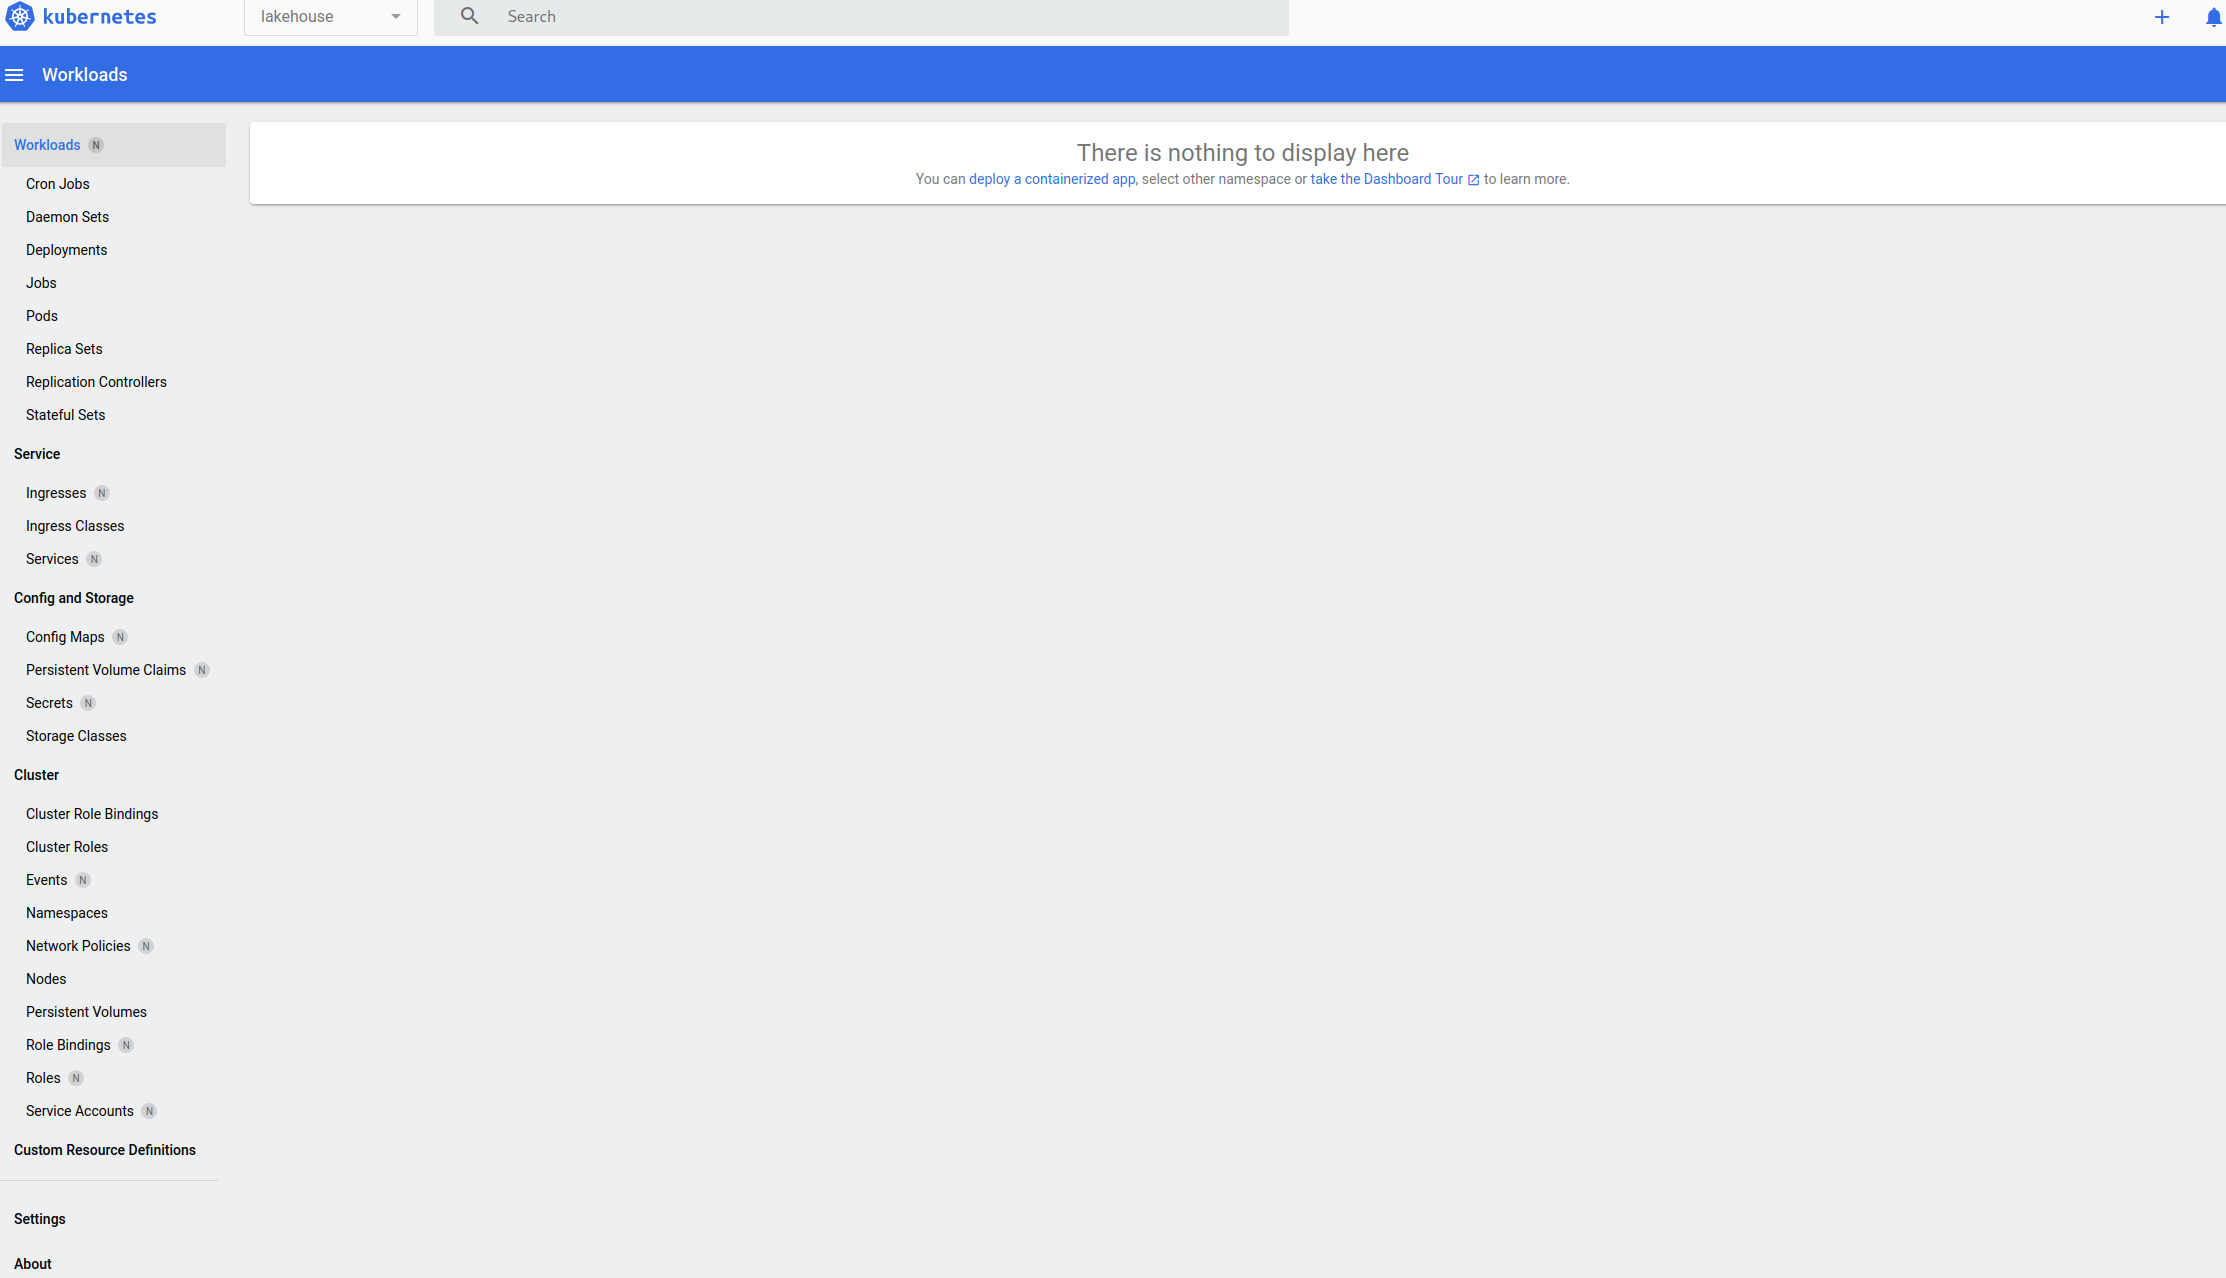
After that is done we can start the Kubernetes dashboard with the following:
minikube dashboardThe command should automatically open the dashboard in our default browser and provide a link that we can follow if that doesn't happen. An example of how it looks (remember to set the namespace to lakehouse in the upper-left drop-down):
We'll also need Helm to install packaged versions of the components we'll use which will make things a lot easier and more streamlined.
With this with a have an extremely basic k8s setup ready for us to proceed to the next phase - setting up a component that will act as our data storage.
Data storage
As mentioned in the stack summary our choice for data storage would be MinIO. The main advantage here is that it is compatible with the AWS S3 API which is widely used and supported by many other pieces of software making e.g. data ingestion or metadata storage easier.
Setting up MinIO is using its Helm chart:
helm repo add minio-operator https://operator.min.io
helm repo update

helm install \
  --namespace lakehouse \
  minio-operator minio-operator/operator
After the chart has been deployed we'll need to forward the port outside to be able to connect as follows:
kubectl --namespace lakehouse port-forward svc/console 9090:9090Then when we go with our browser to localhost:9090 we'll see a login screen that requires us to input a JWT token. The token can be obtained via the command:
kubectl -n lakehouse get secret console-sa-secret -o jsonpath="{.data.token}" | base64 --decodeWhen you've successfully logged in you'll see the operator screen with the option to create a MinIO tenant:

When we click to create a new Tenant we'll see the Tenant creation form. Modify the name, namespace and storage class along with tuning down the resources it uses as locally the default might be too much (we need at least 2 drives per server and the storage class needs enough PVs to be claimed, here we'll use the standard class for simplicity):
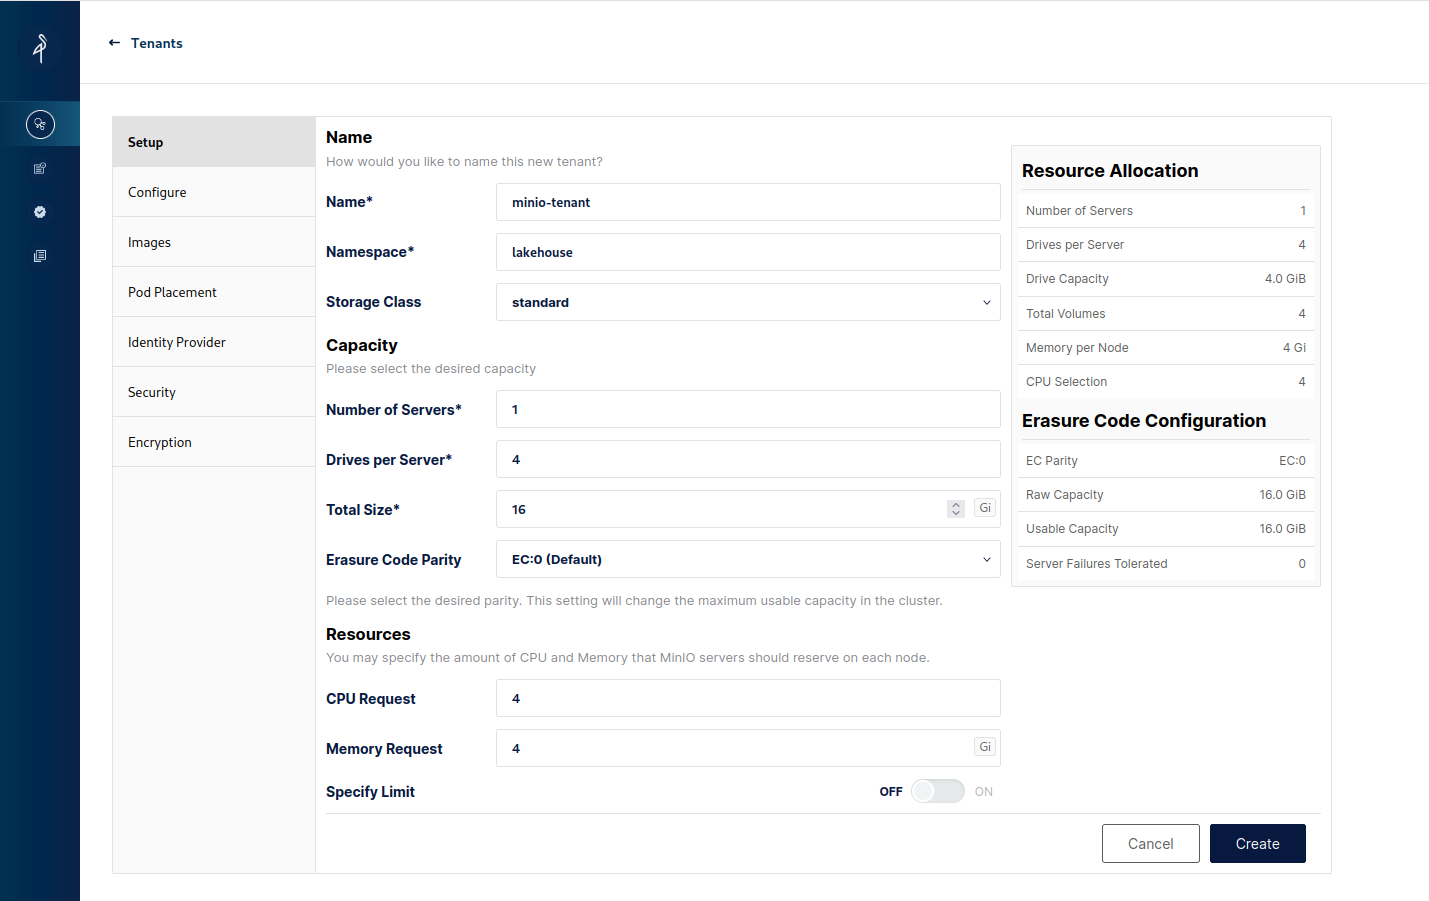
Additionally switch off TLS in Security to make life easier and in the Identity Provider section modify the username and password to something easier - I've chosen lakehouse/lakehouse as the credentials that we'll use to authenticate when connecting to the tenant.
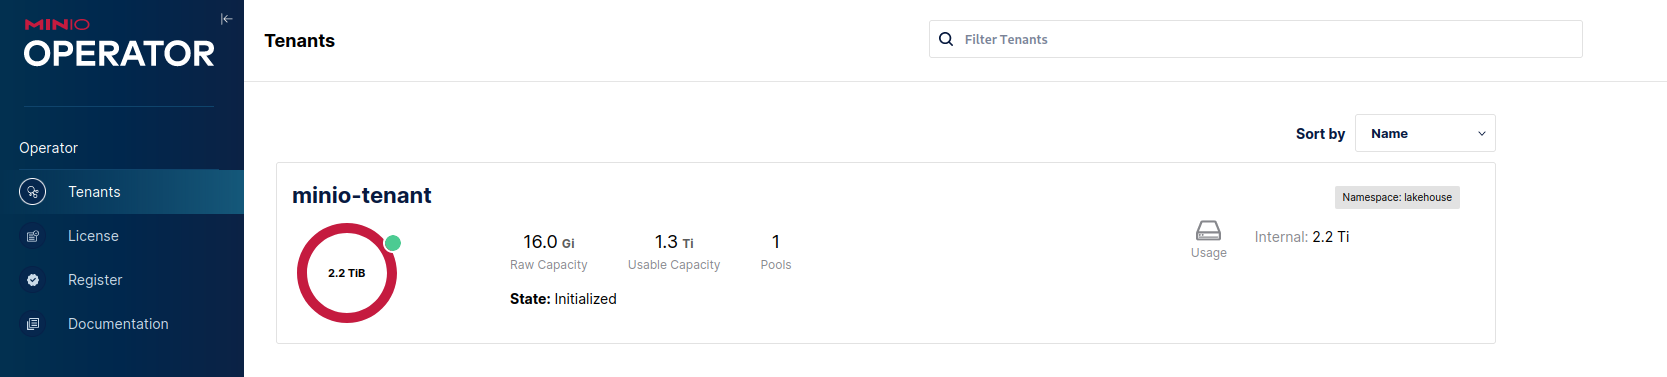
After that is done the rest of the configuration can be left as default (or turn it down further if needed) we can proceed to click the Create button, close the credential popup and we'll see in the tenant list our newly created one:
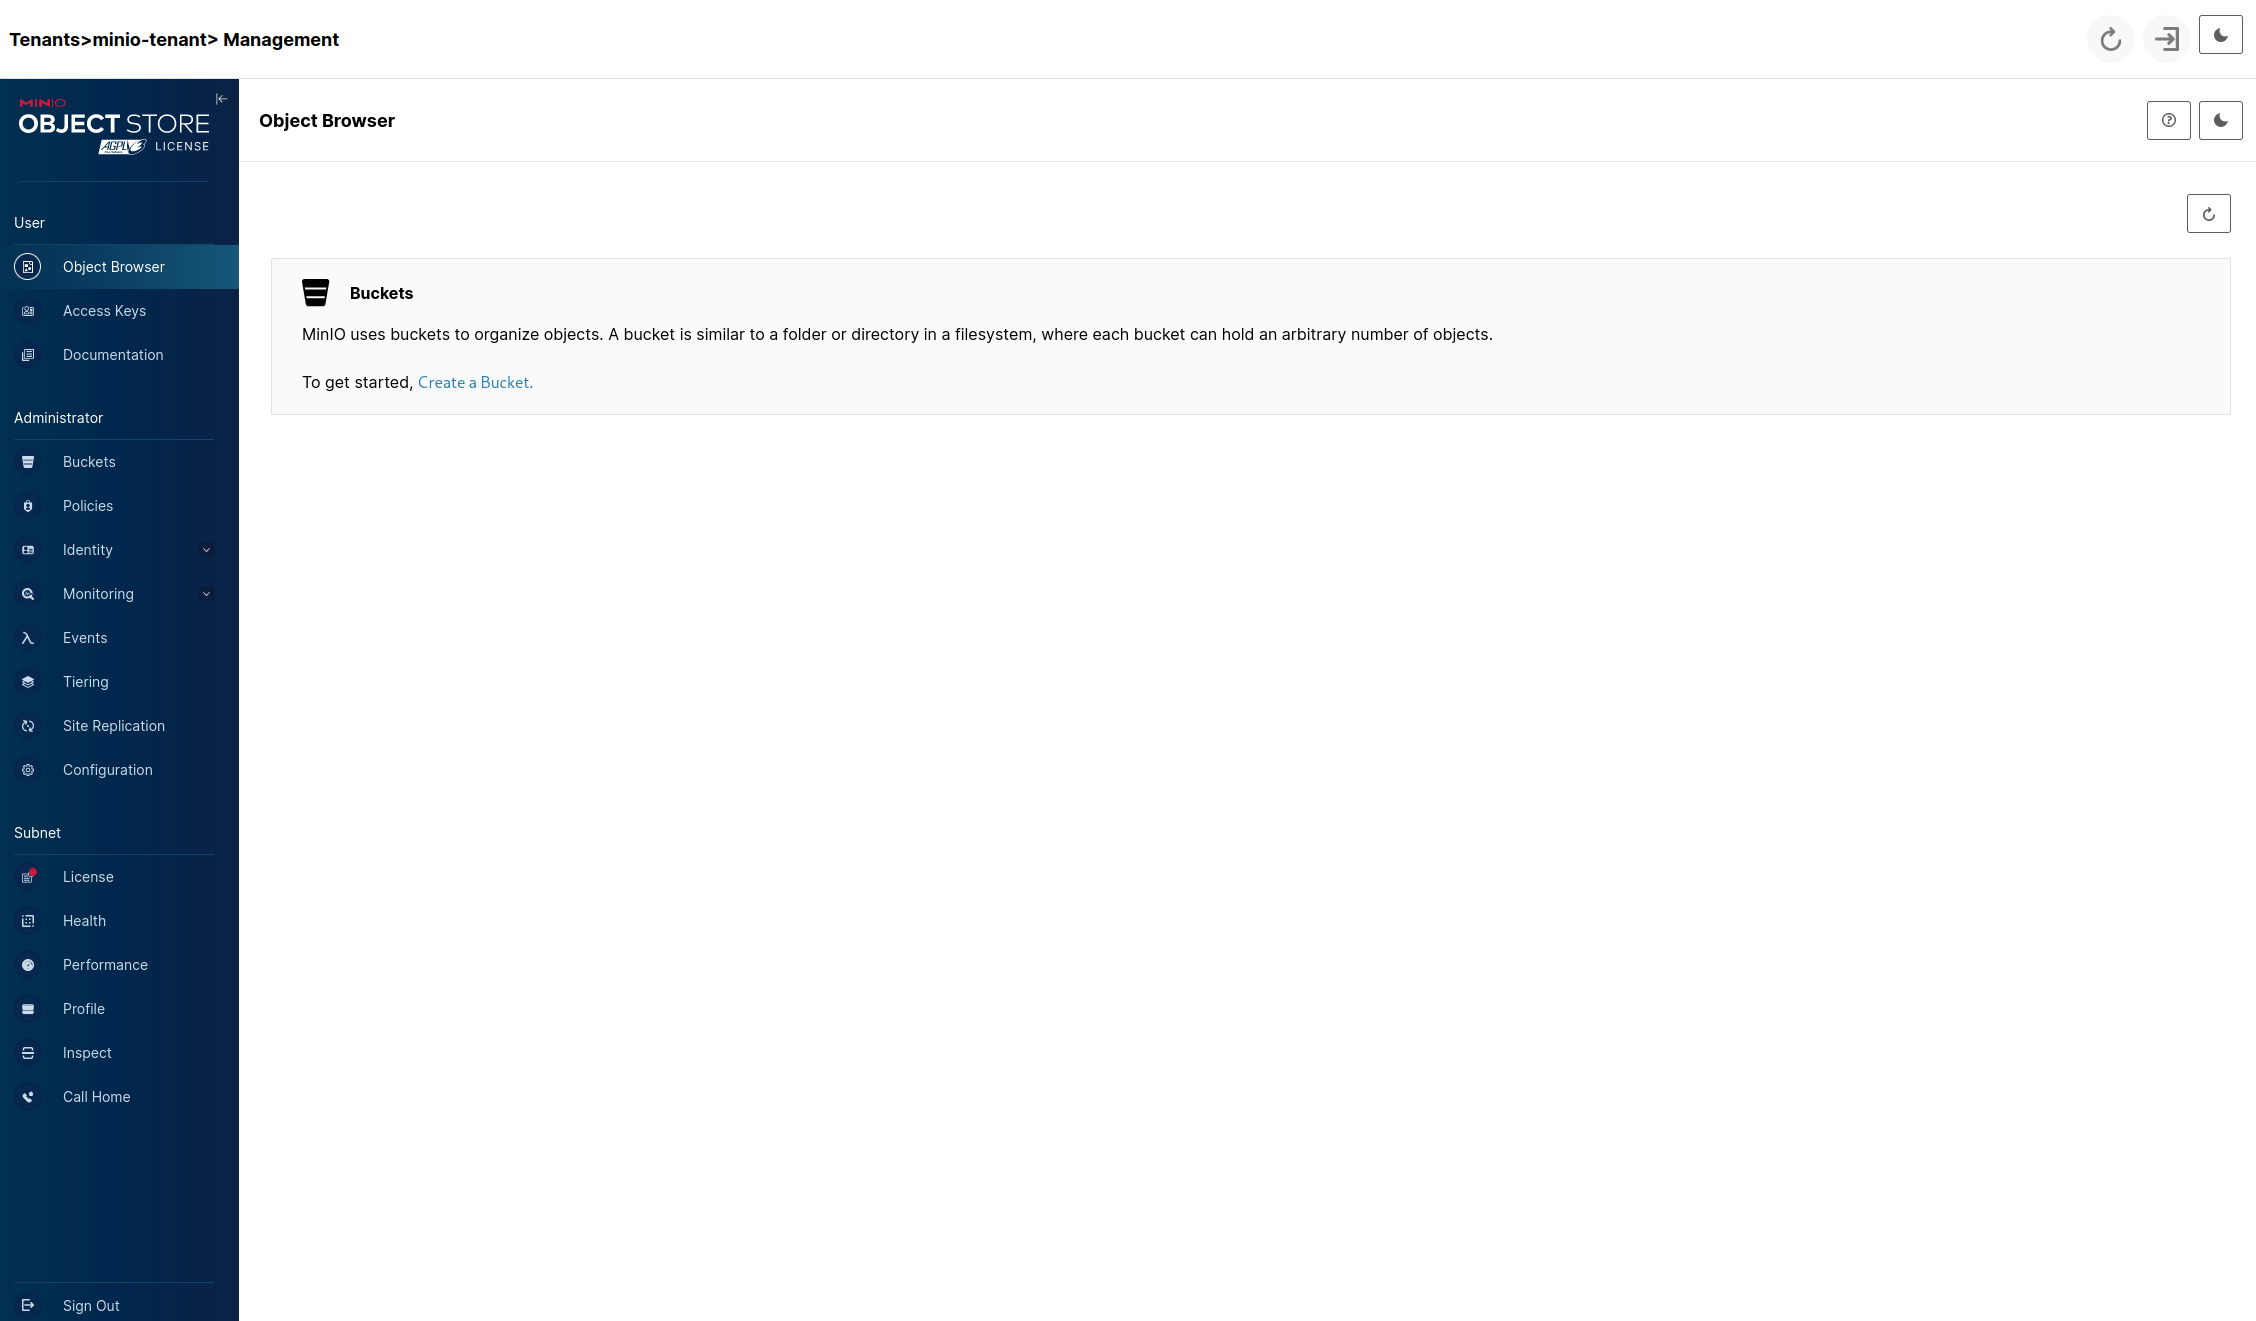
Now let's proceed to configure the tenant and create a few buckets for the lake. Click on the tenant in the list above and in the upper bar click on the Management Console button:

After that you'll be transported into the console of the tenant where we can finish up configuring MinIO for our needs. It should look like this:
Click on the Create a Bucket link after which we'll see:
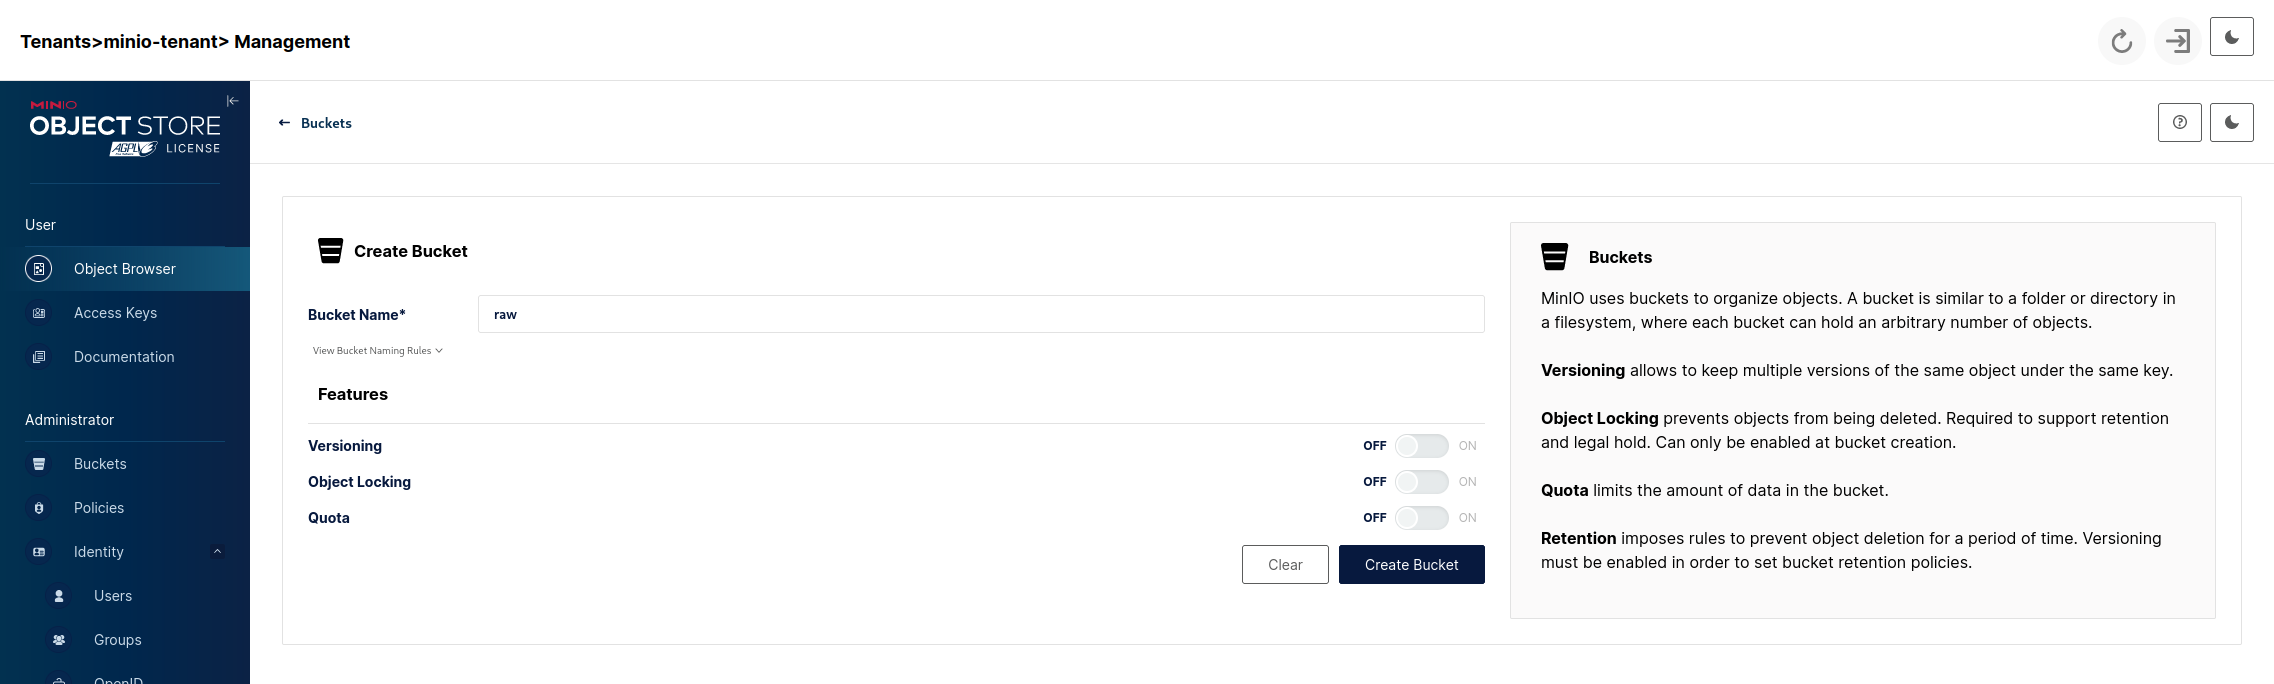
For now we want to create 3 buckets with the following names:
- raw - our landing area where data files will be put as-is.
- standardized - here we put our raw data after transforming it into a standardized format and cleaning it.
- app - this will be data created by our business/analytical applications using the data from standardized.
Additionally we can create a discovery/sandbox bucket or whatever else area our lake will need but the above three can be considered a standard minimum and we'll leave it at that. So we'll end up with:

So now we have a basic data storage structure set up that will serve as the backbone of our Lakehouse. The next step will be adding the catalog.
Data catalog
After the files are transformed into a common format (here it will be Parquet) we want to organize them into tables and catalogs (standardized and app, raw doesn't have one as it is data before structuring) that will enable us to have a common interface to the data and enforce constraints upon it.
We will use Nessie as our data catalog. Aside from managing our table metadata it has a powerful ability to use Git-like versioning of our data, although treat it as a side-note as we'll not be exploring that functionality. A simpler alternative would be Iceberg REST.
Nessie can be easily added to our namespace via Helm chart as follows:
helm repo add nessie-helm https://charts.projectnessie.org
helm repo update

helm install --namespace lakehouse nessie nessie-helm/nessie
After the pod is running we can forward the port to access the UI:
kubectl --namespace lakehouse port-forward svc/nessie 19120:19120
There's nothing there, which is a given considering we still didn't create any table.
NOTE: The default installation as seen above uses the in-memory database which of course will be destroyed on restart or a crash. For real-world usage please consult the configuration documentation which describes the settings needed for connecting it to a proper database. By default security is switched off - check out the Helm options.
Data processing
So now that we have a place to store our data and a catalog to keep the table data. We can move to the last phase which is being able to process the data so we can transform the raw data into the standardized format and create business applications to use that data to create analytical outputs. To achieve that we will use a widely know framework that comes with powerful set of features - Apache Spark.
Prepare some data
The first thing we'll need is some data to actually perform the transformations on. We will use a text file people.txt that we'll put into raw, standardize to Parquet + Iceberg and clean up the result from any garbage. Here is the text:
John Doe 27
Jack Black 48
Neo ''' 29
Adam Smith 12345We want the above in tabular form with the schema:
- first_name (String, only letters)
- last_name (String, only letters)
- age (integer, 0 < age <= 150)
Lets navigate to the raw bucket object browser in our Tenant console UI (Object Browser tab -> raw) and click on the Upload and then Upload File buttons:

Choose the people.txt file and after it gets uploaded we can see it in the bucket:

Setup Spark & execute ETL
Now that we have some test data ready let's proceed to setting up Spark on our cluster and an application that will execute the transformations we want. Again we'll use a Helm chart, this one will install the Spark Operator which will make deploying our applications easier on the cluster:
helm repo add spark-operator https://kubeflow.github.io/spark-operator/
helm repo update

helm install spark-operator spark-operator/spark-operator --namespace lakehouse --set sparkJobNamespace=lakehouse --set webhook.enable=true
Again for simplicity we'll put everything into the lakehouse namespace, including the created jobs to use it by default.
Next we'll create a service account that will be used by the operator and a role attached to it:
kubectl create serviceaccount spark -n lakehouse

kubectl create clusterrolebinding spark-role --clusterrole=edit --serviceaccount=lakehouse:spark --namespace=lakehouse
To verify that everything is set up correctly apply this manifest file with the Spark Pi calculation example (we'll be using the openlake/spark-py:3.3.2 base image as it comes packaged with MinIO and Nessie dependancies):
apiVersion: "sparkoperator.k8s.io/v1beta2"
kind: SparkApplication
metadata:
  name: pyspark-pi
  namespace: lakehouse
spec:
  type: Python
  pythonVersion: "3"
  mode: cluster
  image: "openlake/spark-py:3.3.2"
  imagePullPolicy: Always
  mainApplicationFile: local:///opt/spark/examples/src/main/python/pi.py
  sparkVersion: "3.3.2"
  timeToLiveSeconds: 90
  restartPolicy:
    type: Never
  driver:
    cores: 1
    coreLimit: "1200m"
    memory: "512m"
    labels:
      version: 3.3.2
    serviceAccount: spark
  executor:
    cores: 1
    instances: 1
    memory: "512m"
    labels:
version: 3.3.2kubectl apply -f spark-py-pi.yamlAfter a moment the driver pod will spawn the single executor pod and after the job is finished we can look into the driver pod logs (via the dashboard in the Pod section when the driver pod is selected or CLI) to see that it (should) have executed successfully and the environment sanity check is passed.
We can delete the resource with:
kubectl delete -f spark-py-pi.yamlOr just wait 90 seconds because of the parameter timeToLiveSeconds: 90 . After it terminated (successfully or not) it'll get automatically garbage collected after 90 seconds.
But of course we don't want to just run some example applications delivered with the image itself but our own code. To do that we'll need to build an image that contains our Python file (or JAR when using Scala/Java but here we'll just Pyton).
The code of the application will look like this:
import os
from pyspark import SparkConf
from pyspark import SparkContext
from pyspark.sql import SparkSession
from pyspark.sql.functions import split, col


if __name__ == "__main__":
    spark = SparkSession.builder.getOrCreate()

    spark.sparkContext.setLogLevel("ERROR")

    raw = spark.read.text("s3a://raw/people.txt")

    split_by_whitespace = split(col("value"), " ")

    # We split the singular 'value' column that holds the whole text line into the correct schema and drop the original placeholder
    structured = raw.withColumn("first_name", split_by_whitespace.getItem(0)) \
                    .withColumn("last_name", split_by_whitespace.getItem(1)) \
                    .withColumn("age", split_by_whitespace.getItem(2).cast('int')) \
                    .drop("value")

    # The next will be cleaning it from values that don't satisfy the requirements
    create_name_filter_condition = lambda column_name: col(column_name).rlike("^[a-zA-Z]*$")
    age_filter_condition = col("age").between(1, 150)

    cleaned = structured.filter(create_name_filter_condition("first_name") & create_name_filter_condition("last_name") & age_filter_condition)

    # Now that we have the data in a proper structure and cleaned up we want to persist it as a Parquet file and create the Iceberg metadata for the table
    cleaned.writeTo("standardized.people").create()

spark.stop()The Dockerfile will be extremely simple as all the are already present in the base image:
FROM openlake/spark-py:3.3.2

USER root

WORKDIR /app

RUN pip3 install pyspark==3.3.2

COPY ./main.py .As the Docker image needs to be accessible by minikube we need to switch our shell to point to minikube's Docker daemon before building:
eval $(minikube -p minikube docker-env)

docker build -t spark-etl:v1.0.0 .
After that is done when we run minikube image ls --format table we should see our image in minikube's registry.
Now we'll create a spark-etl.yaml manifest file to execute the above:
apiVersion: "sparkoperator.k8s.io/v1beta2"
kind: SparkApplication
metadata:
  name: spark-etl
  namespace: lakehouse
spec:
  type: Python
  pythonVersion: "3"
  mode: cluster
  image: "spark-etl:v1.0.0"
  imagePullPolicy: IfNotPresent
  mainApplicationFile: local:///app/main.py
  sparkVersion: "3.3.2"
  restartPolicy:
    type: Never
  sparkConf:
    spark.jars.packages: "org.apache.iceberg:iceberg-spark-runtime-3.3_2.12:1.5.0,org.projectnessie.nessie-integrations:nessie-spark-extensions-3.3_2.12:0.79.0"
    spark.sql.extensions: "org.apache.iceberg.spark.extensions.IcebergSparkSessionExtensions,org.projectnessie.spark.extensions.NessieSparkSessionExtensions"
    spark.sql.catalog.standardized.io-impl: "org.apache.iceberg.aws.s3.S3FileIO"
    spark.sql.catalog.standardized.warehouse: "s3a://standardized/"
    spark.sql.catalog.standardized.s3.endpoint: "http://minio.lakehouse.svc.cluster.local"
    spark.sql.catalog.standardized.catalog-impl: "org.apache.iceberg.nessie.NessieCatalog"
    spark.sql.catalog.standardized.uri: "http://nessie.lakehouse.svc.cluster.local:19120/api/v1/"
    spark.sql.catalog.standardized.authentication.type: "NONE"
    spark.sql.catalog.standardized.ref: "main"
    spark.sql.catalog.standardized: "org.apache.iceberg.spark.SparkCatalog"
  hadoopConf:
    fs.s3a.access.key: "lakehouse"
    fs.s3a.secret.key: "lakehouse"
    fs.s3a.endpoint: "http://minio.lakehouse.svc.cluster.local"
    fs.s3a.connection.ssl.enabled: "false"
    fs.s3a.path.style.access: "true"
    fs.s3a.attempts.maximum: "1"
    fs.s3a.connection.establish.timeout: "5000"
    fs.s3a.connection.timeout: "10000"
  driver:
    cores: 1
    memory: "1024m"
    labels:
      version: 3.3.2
    serviceAccount: spark
    env:
        -   name: AWS_REGION
            value: us-east-1
        -   name: AWS_ACCESS_KEY_ID
            value: lakehouse
        -   name: AWS_SECRET_ACCESS_KEY
            value: lakehouse
  executor:
    cores: 1
    instances: 1
    memory: "1024m"
    labels:
      version: 3.3.2
    env:
        -   name: AWS_REGION
            value: us-east-1
        -   name: AWS_ACCESS_KEY_ID
            value: lakehouse
        -   name: AWS_SECRET_ACCESS_KEY
            value: lakehouse
The AWS_REGION value doesn't matter in the above but the library handling the connection for the catalog warehouse requires it.
We inject all the necessary Spark and Hadoop configuration details so the the person developing the code won't have to do it every time to avoid redundancy. Also these kind of low-level details shouldn't be needed when writing the code as they stay the same.
After we run the above with kubectl apply -f spark-etl.yaml and the spawned driver finishes we should see in Nessie our table:

And also the data associated with it (data + metadata) on MinIO:

So we have successfully achieved the goal set at the beginning - we've transformed a raw file into standardized form and established basic infrastructure for data storage and processing using only open source solutions.
Conclusion
In the course of this post we've managed to create from the ground up a simple Data Lakehouse, although many corners were cut and many simplifications were made in the process.
There's a long way to making what we have actually production-ready but this should be enough as a baseline. Hopefully it allowed you to understand better the core technologies that make up the system and how they interact with each other.
I'm planning on expanding what we've created with additional capabilities that are expected of an actually usable solution - these would be a notebook interface, workflow and scheduling, BI. And as we did here, all that without going into the nitty-gritty with more focus on getting something working quickly and having the ability to iterate over it if we want more.
Thank you all for reading and I hope you've found it interesting (and most importantly, helpful).
Cheers!